序言
歡迎來到「跟著官方學程式」 ( Learning From Android, LFA ) 的第三章。
因為要追 architecture sample 的源碼真的太累了,所以我們這次要從 Hilt 的 codelab 進行。
不過我會盡量將需要或不需要的資訊都寫出來,哈哈哈。
另外,這個系列不太會有圖檔。 因為我的目標是從官方的程式中有效且快速地複習與更新我的 Android 知識。希望能早日回到職場上。
在介紹 Hilt 的用法之前,我們先講一下 DI, Singleton 與 ServiceLocator 的愛恨情仇以及為什麼要使用 Hilt。
DI, Singleton 與 ServiceLocator 的愛恨情仇
首先,我們在編寫程式的時候, OOP 理應需要遵守 SOLID 規範。
SOLID 指的是五個主要規範 :
| Abbreviation | Acronym | Meaning | Description |
|---|---|---|---|
| S | SRP | Single Responsibility Principle | 每個類別只能有單一職責。 |
| O | OCP | Open-Close Principle | 程式設計中,不管是模組、類別、方法、等等,都應該可被延展,但也應當不被修改。 |
| L | LSP | Liskov Subsitution Principle | 程式中,父類別可以由子類別替換,並不會造成任何未知的影響。 |
| I | ISP | Interface Segration Principle | 在程式設計中,類別不應當存在他所不需要的方法。 因此,我們可以用介面或抽象類別將方法按職責分開來。並只實作所需要的介面即可。 |
| D | DIP | Dependency Inversion Principle | 1. 高層次的模組不應該依賴於低層次的模組,兩者都應該依賴於抽象介面。 2.抽象介面不應該依賴於具體實現。而具體實現則應該依賴於抽象介面。 |
基於 SOLID,我們來設計一個簡單範例吧。
假設我們要設計一個 「圖書管理員」 (Librarian)。 他的功能只有尋找與存放書籍資料。 我們可能會寫成 :
class Librarian {
    fun getBook(id: ISBN): Book? {
        return database.getBook(id)
    }

    fun storeBook(book: Book): Boolean {
        return database.storeBook(book)
    }
}
這只是 psudocode 所以就先忽略 async 的部分吧。
由上面的寫法可以看出, Librarian 需要一個 database。 如果這只是個小專案,也許我們會想要將 database 的創建寫在 Librarian 裡 :
class Librarian {

    private val database = Database()

    fun getBook(id: ISBN): Book? {
        return database.getBook(id)
    }

    fun storeBook(book: Book): Boolean {
        return database.storeBook(book)
    }
}
以上 Librarian 的寫法其實 違反了 SRP, 因為他不應該負責創建 Database 的。對此,我們有多個解決方案來 :
| 方案 | 內容 |
|---|---|
| Singleton | 由 Singleton 負責創建 Database,Librarian 只負責調用 Database 的功能。 |
| Dependency Injection | 為了更好的可塑性與重複使用,我們可以使用 DI 的方式將 Database 注入方法中。 |
| ServiceLocator | 為了能管理這些 DI,我們還可以使用 ServiceLocator 來統一管理。 |
這些方案我都會在下面一一說明。
Singleton
通常資料庫只有一個,所以我們一般都會將資料庫寫成 Singleton 好讓物件們可以從不同執行緒或類別中取得資料庫。
object Database {
    ...
}

// java
// 參考 : https://skyyen999.gitbooks.io/-study-design-pattern-in-java/content/singleton.html
public class Database {
    private static Database instance;

    private Database(){ /*setup code*/ }

    public static Database getInstance(){
        if(instance == null){
            synchronized(Database.class){
                if(instance == null){
                    instance = new Database();
                }
            }
        }
        return instance;
    }
}
並讓 Librarian 直接使用他的內部方法 :
class Librarian {

    fun getBook(id: ISBN): Book? {
        return Database.getBook(id)
    }

    fun storeBook(book: Book): Boolean {
        return Database.storeBook(book)
    }
}
儘管 Singleton 很方便,也不違反 SRP ,但他有以下缺點 :
- Non-Thread safe 當然,在 Java 中我們可以通過
synchornization來防止多個執行緒同時創建 Database。 而 Kotlin 則會通過 static init block 來讓 classloader 進行同步創建 。所以其實 Java 中也可以通過 static block 來設定 Singleton。但是,除了創建之外,Singleton 中的全域變數的讀寫也是需要受到 thread safety 的保護的。 這時可以使用 mutex 或是 lock 來確保只有單一執行緒可進行讀寫。 - 難以測試 由於 Singleton 是一個 Global State,所以與他牽扯的地方太廣,導致難以測試。
- Tight Coupling 由於使用 Singleton 時,我們通常都會直接在方法中取得 instance 並對其調用。 這樣就會造成難以更換,以及難以測試。
為了加強可塑性以及程式的可重複使用性,我們可以通過 Injection 將 Database 注入其中。
Dependency Injection
DI 或 Dependency Inject 除了能讓方法或類別遵守 SRP 外,他也是一種減少耦合性的編程方法。
最基本的寫法是 :
class Librarian constructor(private val database: Database) {

    fun getBook(id: ISBN): Book? {
        return database.getBook(id)
    }

    fun storeBook(book: Book): Boolean {
        return database.storeBook(book)
    }
}
但這並沒有解決耦合性。 所謂 耦合性 (Coupling) 指的是物件之間的依賴性。 猶如 Librarian 依賴著 Database 一樣。
在原本的寫法中,如果我們想要更換不同的 Database 時,我們就需要進入 Librarian 進行修改。 這就 違反了 OCP 。
當然,第二種寫法雖然遵守著 OCP 與 SRP, 但卻 違反了 DIP。 這是因為 Librarian (高層) 依賴著 Database (低層)。
為此,我們需要新增一個符合 Database 的介面,這樣才能 遵守 ISP :
interface IDatabase {
    fun getBook(id: ISBN): Book?
    fun storeBook(book: Book): Boolean
}

class InMemoryDatabase : IDatabase {

    private val data = hashMapOf<ISBN, Book>()

    override fun getBook(id: ISBN): Book ? {
        synchronize(this) {
            return data.get(id)
        }
    }

    override fun storeBook(book: Book): Boolean {
        synchronize(this) {
            return data.put(book.id, book) == null
        }
    }
}
如此一來, Librarian 與 Database 的關係的轉變如下 :
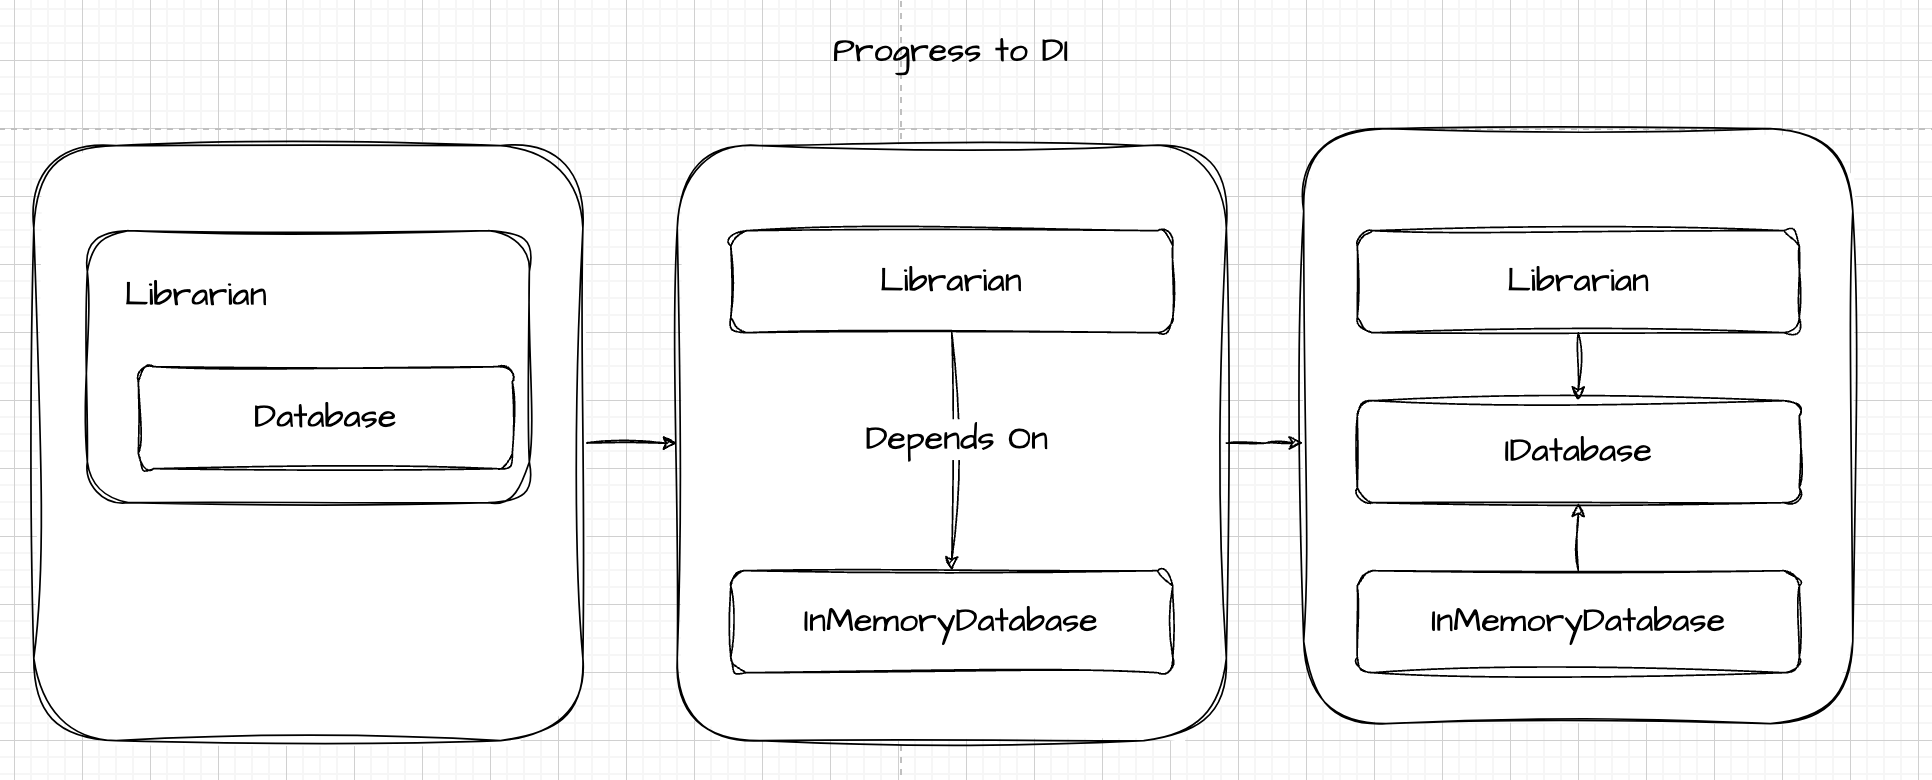
而 IDatabase、 Librarian 與 InMemoryDatabase 之間的關係我們稱之為 IoC (Inversion of Control) 或 控制反轉。
IoC 的名稱由來是因為在傳統的 程序式程式設計 (Procedure Programming) 中,我們寫的方法都會調用函式庫或框架中的方法。 而 IoC 卻是相反,函式庫或框架會調用我們設計的方法。 這就如同原本被依賴的 InMemoryDatabase ,變成依賴 IDatabase 一樣。
當然,這個解釋似乎有點牽強,但如果用圖來表示就可以看出來了 :
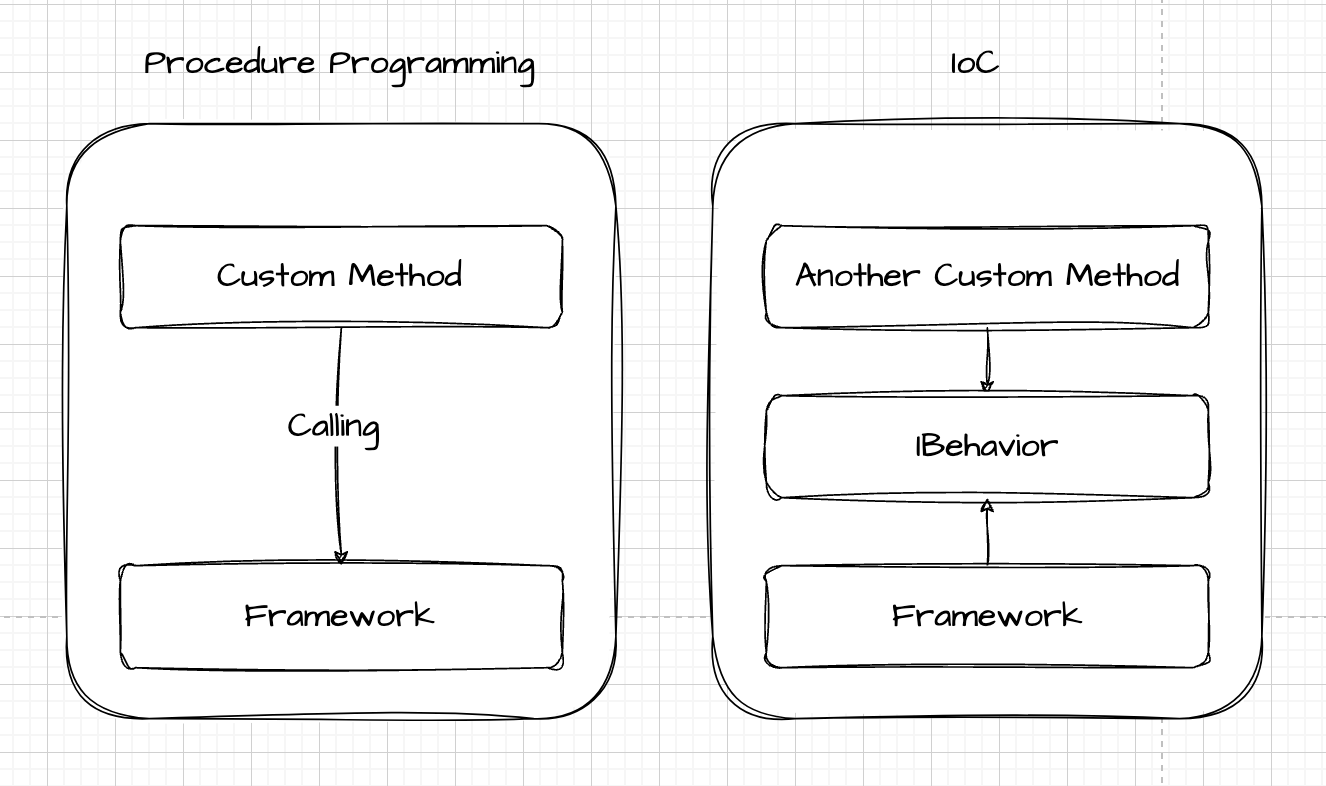
切記 : Java 或 Android 所說的 IoC 並非與 Inversion of Control Flow 相同。 雖然概念差不多。
通過這樣修改,我們成功地遵守了 SOLID 並優化了以下特性:
- 代碼的重複性使用
- 若要重構也更簡單
- 也讓我們更容易測試
但由於純 DI 需要確保所需要的物件與設定能隨時順利取得,所以為了方便性,我們也會將 DI 與 Singleton 的屬性結合,成為 ServiceLocator。
ServiceLocator
一個應用程式,一般都會有很多共用的類別與功能,像是 Repository 、 SharedPreference 和 Navigator。 可以把他們想像成政府單位的很多部門, 而每個部門都有自己的職責。當我們想要做某件事時,以許會需要通過多個部門才能完成。
雖然事情還是可以辦成,但缺點就是我們需要到處跑。 這代表著,使用的源碼也會到處都是。 想要解決這點就可以使用 ServiceLocator。
雖然 ServiceLocator 與 Singleton 的功能很相似,但是我們可以通過註冊與取得來進行物件的注入。如此一來就可以注入不同的「服務」了。
class ServiceLocator (applicationContext: Context) {
    companion object {
        private val map = mutableMapOf<Class<*>, Any>()
        private val obj = Any()

        fun registerService(service: Any) {
            synchronized(obj) {
                map[service.javaClass] = service
            }
        }

        fun getService(key: Class<*>): Any? {
            synchronized(obj) {
                return map[key]
            }
        }
    }
}
為了要更明確有哪些「服務」,我們通常會直接在 ServiceLocator 中創建指定的服務,就如同 codelab 給的範例一樣 :
class ServiceLocator(applicationContext: Context) {

    // Database
    private val logsDatabase = Room.databaseBuilder(
        applicationContext,
        AppDatabase::class.java,
        "logging.db"
    ).build()

    // Database Source ,他的實作需要通過 Dao 完成。所以這裡可以使用 DI :
    val loggerLocalDataSource = LoggerLocalDataSource(logsDatabase.logDao())

    fun provideDateFormatter() = DateFormatter()

    fun provideNavigator(activity: FragmentActivity): AppNavigator {
        return AppNavigatorImpl(activity)
    }
}
而我們的範例則可以寫成 :
class ServiceLocator() {
    private val database by lazy {InMemoryDatabase()}

    fun getBook(id: ISBN): Book? {
        return database.getBook(id)
    }

    fun storeBook(book: Book): Boolean {
        return database.storeBook(book)
    }
}
當然,ServiceLocator 需要在 Application 開始時就準備好。 所以我們需要創建自己的 Application 類別:
class LogApplication : Application() {

    lateinit var serviceLocator: ServiceLocator

    override fun onCreate() {
        super.onCreate()
        serviceLocator = ServiceLocator()
    }
}
如果想要進行測試,我們甚至可以定義一個 IServiceLocator 來隨時將 ServiceLocator 進行替換。如同 官方範例中的寫法。
是否看起來簡單多了呢?
雖然 ServiceLocator 看似很好用,但當我們需要的服務越來越多時,ServiceLocator 也會越來越混亂。 就算我們將 ServiceLocator 細分並注入到需要使用的類別中,有的時候他們之間可能會有相關性或需要對方的功能。 像是 RepositoryServiceLocator 會使用到 LocalRepositoryServiceLocator 與 RemoteRespositoryServiceLocator。 當然,這不是最好的範例,但你應該暸解我的意思吧? XD
所以最後取而代之的便是 Hilt。 一個讓我們可以使用 DI 又不需要我們手動注入的工具。
切記 : 沒有一個模式是完美的,但我們只能盡量使用對目前架構或未來架構更有利的設計罷了。
Hilt
dependency
舊的版本
這裡我們需要兩個東西:
- Project Gradle 中的 Plugin 載入
- App Gradle 中的 Dependency + Plugin
// project
buildscript {
    ext.kotlin_version = '1.7.20'
    ext.hilt_version = '2.45'
    repositories {
        google()
        mavenCentral()
    }
    dependencies {
        // ...
        classpath "com.google.dagger:hilt-android-gradle-plugin:$hilt_version"
    }
}

allprojects {
    repositories {
        google()
        mavenCentral()
    }
}

tasks.register('clean', Delete) {
    delete rootProject.buildDir
}

// Module

plugins {
    // ...
    // Hilt plugin
    id 'dagger.hilt.android.plugin'
}

dependency {
    // ...
    // Hilt dependencies
    implementation "com.google.dagger:hilt-android:$hilt_version"
    kapt "com.google.dagger:hilt-android-compiler:$hilt_version"
}
新的版本
由於新的架構與舊的版本還是有所差異,所以為了不要弄巧成拙就在這一行帶過了。
KAPT 轉換成 KSP
由於 Hilt 還沒支援 KSP,除了最新的 alpha 版。 所以我們就先不將 Room 的 KAPT 轉換成 KSP 了。 相關文章 和 官方 Issue
Gradle 說明
官方下載下來的 code 中有一段是這樣寫的:
defaultConfig {
    // ...

    // 這是什麼?
    javaCompileOptions {
        annotationProcessorOptions {
            arguments["room.incremental"] = "true"
        }
    }
}
這個其實是為了減少 Room 這個模組的處理次數而設定的,而這個行為我們稱之為 「增量處理」或 Incremental Processing。
所謂的「處理」指的是 change-compile-test 的流程。
通過 增量計算 (Incrmental Computing),編譯器只會針對更新過的部分進行計算與更新。 如此一來就會大幅縮短 compile 的時間了。而在 Android 中,則會縮短 build (建構) 的所需時間。
由於有些 函式庫,包括 Room, kapt, Glide, Realm, Lifecycle, EventBus … 等等都有使用這個工具。
所以為了能縮短編譯時間,我們會希望能使用這個工具。而 Kotlin 也在 Kotlin 1.3.30 時支援此功能。
除了 Kotlin 版本的要求外,我們還需要在 gradle.properties 中定義以下參數值:
kapt.incremental.apt=true // apt : annotation processing tool
想要暸解更多可以去上面提到的官方查詢,另外, 這是 Room 中註冊 Processor 的其中一個檔案,以供參考:
// https://android.googlesource.com/platform/frameworks/support/+/android-room-release/room/compiler/src/main/resources/META-INF/services/javax.annotation.processing.Processor?autodive=0%2F%2F%2F%2F%2F

androidx.room.RoomProcessor
Hilt 的起手式
有了函式庫,我們看看要如何讓專案使用 Hilt 吧。
每一個使用 Hilt 的 App 都必須要有一個使用
@HiltAndroidApp的 Application。@HiltAndroidApp會引發 Hilt 創建源碼,包括創建一個 App 的頂層元件 (parent component) 或 base class。 通過這個元件, Hilt 才可在 Application 的生命週期中進行注入行為。另外,這也表示內部的元件皆可以取得他提供的依賴物件。
| Annoation | 功能 | 注意事項 |
|---|---|---|
@HiltAndroidApp | 使用 Hilt 的所有應用程式都必須包含以 @HiltAndroidApp 加註的 Application 類別。 | 必須使用 |
@AndroidEntryPoint | 通過 @AndroidEntryPoint Hilt 就可為此元件的其他 Android 類別提供依附元件 目前支援: - Application ( @HiltAndroidApp)-ViewModel ( @HiltViewModel)-Activity (必須繼承 FragmentActivity)br>-Fragment (必須繼承 androidx.fragment.app.Fragment 且不是 retained Fragment) -View -Service -BroadcastReceiver | 使用 @AndroidEntryPoint 後,必須為使用該片段的任何活動加上註解。 |
Warning: Hilt 不支援 retained fragments.
HiltAndroidApp 範例
在 codelab 源碼中,我們只需要將 @HiltAndroidApp 寫在 LogApplication 上即可:
@HiltAndroidApp
class LogApplication : Application()
細談 AndroidEntryPoint
通過 @AndroidEntryPoint Hilt 會針對專案中的每個 Android 類別產生個別 Hilt 元件。這些元件都會被定義其中一種 Hilt 層級:

這些元件可以從其各自的父項類別接收依附元件。 這裡的父類別指的是 Hilt。
而所謂的「依附元件」其實就是參數,就像是範例中的 analytics:
@AndroidEntryPoint
class ExampleActivity : AppCompatActivity() {

  private lateinit var analytics: AnalyticsAdapter
  ...
}
如果想要讓子元件能取得 analytics,就使用 @Inject 即可:
@AndroidEntryPoint
class ExampleActivity : AppCompatActivity() {

  @Inject lateinit var analytics: AnalyticsAdapter
  ...
}
這裡設為 public,是為了讓 Hilt 可以注入。 但也要記住 不能讓他人手動注入,因為這會導致錯誤發生。
最後,我們需要讓 Hilt 知道如何創建 AnalyticsAdapter 。 這可以通過在 AnalyticAdapter 的建構子上加上 @Inject 即可:
class AnalyticsAdapter @Inject constructor(
  private val service: AnalyticsService
) { ... }
這樣讓 Hilt 知道「哪裡需要注入」及「如何注入」 的行為稱為 bindings 。
當然, @AndroidEntryPoint 並不限制在 Activity ,但我們必須要在 MainActivity 也加上 @AndroidEntryPoint 才行,否則會出現以下錯誤:
java.lang.IllegalStateException: Hilt Fragments must be attached to an @AndroidEntryPoint Activity. Found: class com.example.android.hilt.ui.MainActivity
AndroidEntryPoint 範例
@AndroidEntryPoint
class LogsFragment : Fragment() {
    @Inject lateinit var logger: LoggerLocalDataSource
    @Inject lateinit var dateFormatter: DateFormatter
}
其中我們想要注入的 DataFormatter 可以在 util/DataFormatter.kt 找到:
class DateFormatter @Inject constructor() {
    // ...
}
我們也可以在 data\LoggerLocalDataSource.kt 找到 LoggerLocalDataSource,然後在建構子加上 @Inject :
class LoggerLocalDataSource @Inject constructor(private val logDao: LogDao) {
    // ...
}
另外,別忘記進入 LogsFragment 的 MainActivity :
@AndroidEntryPoint
class MainActivity : AppCompatActivity()
Hilt 的元件介紹
Hilt 共有 8 種元件。每個元件都有特定的生命週期以及代表的對象,如下:
| Generated component | Created at | Destroyed at | Injector for |
|---|---|---|---|
| SingletonComponent | Application#onCreate() | Application destroyed | Application |
| ActivityRetainedComponent | Activity#onCreate() | Activity#onDestroy() | N/A |
| ViewModelComponent | ViewModel created | ViewModel destroyed | ViewModel |
| ActivityComponent | Activity#onCreate() | Activity#onDestroy() | Activity |
| FragmentComponent | Fragment#onAttach() | Fragment#onDestroy() | Fragment |
| ViewComponent | View#super() | View destroyed | View |
| ViewWithFragmentComponent | View#super() | View destroyed | View annotated with @WithFragmentBindings |
| ServiceComponent | Service#onCreate() | Service#onDestroy() | Service |
若用圖表來表示,應該是長這樣:

生命週期的範例
譬如上一節談到的 @Inject :
@AndroidEntryPoint
class LogsFragment : Fragment() {
    @Inject lateinit var logger: LoggerLocalDataSource
    @Inject lateinit var dateFormatter: DateFormatter
}
由於這是 FragmentComponent,所以這兩個 @Inject 都會在 onAttach 時被注入,並在 onDestroy 時被消滅。
Hilt 元件的使用範圍 (Scope)
當我們在使用 @Inject 時,Hilt 的 預設行為 就是 _每次都創建新的物件_。
下面讓我們展示一下吧。
展示 Inject 的預設行為
首先,我們只保留 DateFormatter 的 @Inject :
@AndroidEntryPoint
class MainActivity : AppCompatActivity() { /* code */ }

class DateFormatter @Inject constructor() { /* code */ }

class LoggerLocalDataSource(private val logDao: LogDao) { /* code */ }

@AndroidEntryPoint
class LogsFragment : Fragment() {

    lateinit var logger: LoggerLocalDataSource
    @Inject lateinit var dateFormatter: DateFormatter
    // ...
}
接下來,我們在 LogsFragment 的 onAttach 添加 :
android.util.Log.d("LOG_FRAG", "onAttach $dateFormatter")
當我們跑起 app 時,通過反覆進入和離開 LogsFragment,我們會發現 dateFormatter 會不斷地被創建。
如果我們希望這個物件可以跟著其他元件的生命週期來創建與釋放,這時我們就需要使用 Hilt Scope 了。
Hilt 的 Scope
每一個 Hilt 元件都有對應的生命週期 或 Scope :
| Android class | Generated component | Scope |
|---|---|---|
| Application | SingletonComponent | @Singleton |
| Activity | ActivityRetainedComponent | @ActivityRetainedScoped |
| ViewModel | ViewModelComponent | @ViewModelScoped |
| Activity | ActivityComponent | @ActivityScoped |
| Fragment | FragmentComponent | @FragmentScoped |
| View | ViewComponent | @ViewScoped |
View annotated with @WithFragmentBindings | ViewWithFragmentComponent | @ViewScoped |
| Service | ServiceComponent | @ServiceScoped |
也就是說,如果我希望 dateFormatter 能跟著 Application 的生命週期,那我就會使用 @Singleton。 如此一來, dateFormatter 會在 Application#onCreate 時就會被創建 (若有需要的話)。
@Singleton 的範例
我們可以在 LogApplication 中新增 dateFormatter :
@HiltAndroidApp
class LogApplication : Application() {

    lateinit var serviceLocator: ServiceLocator

    @Inject
    lateinit var dateFormatter: DateFormatter
    override fun onCreate() {
        super.onCreate()
        serviceLocator = ServiceLocator(applicationContext)

        Log.d("LOG_APP", "onCreate : $dateFormatter")
    }
}
並添加 @Singleton 在 DateFormatter 上 :
@Singleton
class DateFormatter @Inject constructor()
最後我們就可以在 Logger 中看到以下結果 :
LOG_APP                 com.example.android.hilt             D  onCreate : com.example.android.hilt.util.DateFormatter@3f45ca07
LOG_FRAG                com.example.android.hilt             D  onAttach com.example.android.hilt.util.DateFormatter@3f45ca07
你會發現他們都使用同一個 DataFormatter。
那如果我們只需要 dateFormatter 在 MainActivity 中使用呢?
這時我們可以使用 @ActivityScoped 或 @ActivityRetainedScoped。
@ActivityScope 與 @ActivityRetainedScoped
首先,我們先將 LogApplication 中的 dateFormatter 移除,否則待會會出現錯誤訊息。
再來,我們將 DateFomatter 的 Scope 改成所需要的 Scope 即可。
我們第一個反應會想要 @ActivityScope:
@ActivityScoped
class DateFormatter @Inject constructor()
當我們跑起來時,我們可以看到 dateFormatter 在多次進出 LogFragment 後依舊保持一致:
LOG_FRAG                com.example.android.hilt             D  onAttach com.example.android.hilt.util.DateFormatter@34e523b0
LOG_FRAG                com.example.android.hilt             D  onDestroy
LOG_FRAG                com.example.android.hilt             D  onAttach com.example.android.hilt.util.DateFormatter@34e523b0
但如果我們將手機轉向呢? 也就是進行 Configuration change。(記得要在 Manifest 中將 Activity 的android:orientation 設為 unspecified)
LOG_FRAG                com.example.android.hilt             D  onDestroy
LOG_FRAG                com.example.android.hilt             D  onAttach com.example.android.hilt.util.DateFormatter@19d51708
你會發現新的 DateFormatter 被創建了。
但如果我希望保留內部的訊息呢? 那我就可能不希望 dateFormatter 被更改了。 這時,我們就可以使用 @ActivityRetainedScoped :
@ActivityRetainedScoped
class DateFormatter @Inject constructor()
結果會是如下 :
LOG_FRAG                com.example.android.hilt             D  onAttach com.example.android.hilt.util.DateFormatter@12af99ae

// 離開再進入
LOG_FRAG                com.example.android.hilt             D  onDestroy
LOG_FRAG                com.example.android.hilt             D  onAttach com.example.android.hilt.util.DateFormatter@12af99ae

// 旋轉
LOG_FRAG                com.example.android.hilt             D  onDestroy
LOG_FRAG                com.example.android.hilt             D  onAttach com.example.android.hilt.util.DateFormatter@12af99ae
現在理解了,我們可以跟上 codelab 的步驟了。
Scope 的範例
// Default Scope
class DateFormatter @Inject constructor()

@Singleton
class LoggerLocalDataSource @Inject constructor(private val logDao: LogDao)
從我們對 Hilt 的了解,想必你會看出上面的問題吧?
看不出也沒關係,寫久就知道了。
想要讓 Hilt 創建 LoggerLocalDataSource , Hilt 需要知道如何創建 LogDao。
但由於 LogDao 是個介面,所以根本沒有建構子進行 @Inject。
這時我們就要談談 Hilt Module 了。
Hilt Module
一般的物件 Hilt 都可以通過 Hilt Component 進行 Binding。 但由於介面沒有建構子,所以無法進行 binding。
這時,我們需要以下 Annotation 來讓 Hilt 知道什麼時候該做什麼事 :
| annotation | 作用 | 範例 |
|---|---|---|
@Module | 讓 Hilt 知道該類別是 Module | — |
@InstallIn | 讓 Hilt 知道這個 Module 會在什麼元件的生命週期創建和毀滅 | @InstallIn(SingletonComponent::class) |
定義 Module 範例
由於 LoggerLocalDataSource 會在 LogApplication 中創建,所以我們也是在 Application Container 中就需要取得 LogDao。 因此, Module 的創建時機會是 SingletonComponent::class :
@InstallIn(SingletonComponent::class)
@Module
object DatabaseModule { /**/ }
除了 object 外, Module 也可以是抽象類別。 但這裡我們選擇使用 object。
至於為什麼使用 object 呢? 這之後會提到。
接下來,我們需要跟 Hilt 說明要如何取得 LogDao。
Module 的行為
Module 的行為會有兩種 : |行為|為何使用?| |:–|:–|:–:| |@Binds|當我們想要 binds 介面 | |@Provides|當介面不是由我們實作 |
在 ServiceLocator 中我們可以看到 :
private val logsDatabase = Room.databaseBuilder(
        applicationContext,
        AppDatabase::class.java,
        "logging.db"
    ).build()

val loggerLocalDataSource = LoggerLocalDataSource(logsDatabase.logDao())
由於 LogDao 可以通過 logsDatabase.logDao() 取得 :
@Singleton
class LoggerLocalDataSource @Inject constructor(private val logDao: LogDao)
而 logsDatabase 又會從 AppDatabase 取得 :
@Database(entities = arrayOf(Log::class), version = 1, exportSchema = false)
abstract class AppDatabase : RoomDatabase() {
    abstract fun logDao(): LogDao
}
所以這形成了一個 傳遞依賴 (transitive dependency) :
LoggerLocalDataSource 依賴/需要 LogDao 且 LogDao 依賴/需要 AppDatabase 所以 LoggerLocalDataSource 依賴 AppDatabase
因為如此,我們便可以將方法定義為 @Provides。
Module @Provides 的範例
定義 Module 中的方法時,他會有以下格式 :
@Provides
fun {方法名稱} ({被依賴者}) : {目標對象} {
    return {目標對象}
}
這裡的目標對象是 LogDao , 而他依賴的物件是 AppDatabase ,
@Module
@InstallIn(SingletonComponent::class)
object DatabaseModule {
    @Provides
    fun provideLogDao(database: AppDatabase): LogDao {
        return database.logDao()
    }
}
請注意:
provideLogDao並沒有指定 Scope,所以只要有需要這方法都會被調用。
當然,除了 LogDao 的創建,我們還需要跟 Hilt 說要如何創建 AppDatabase 。
// ServiceLocator.kt
private val logsDatabase: AppDatabase = Room.databaseBuilder(
        applicationContext,
        AppDatabase::class.java,
        "logging.db"
    ).build()
我們注意到 AppDatabase 的創建需要用到 Context,而 Context 原來是其中一種每個 Hilt 元件都可取得的元件之一,另一個是 @ActivityContext。 所以我們可以直接使用 @ApplicationContext 取得 :
@Module
@InstallIn(SingletonComponent::class)
object DatabaseModule {
    @Provides
    fun provideLogDao(database: AppDatabase): LogDao {
        return database.logDao()
    }

    @Provides
    @Singleton
    fun provideDatabase(@ApplicationContext appContext: Context): AppDatabase {
        return Room.databaseBuilder(
            appContext,
            AppDatabase::class.java,
            "logging.db"
        ).build()
    }
}
由於我們希望 AppDatabase 保持不變,所以我們會使用 Singleton。
現在當我們想要取得 LogDao 時,他就會通過 provideDatabase 取得 AppDatabase 並將其注入 provideLogDao 中。
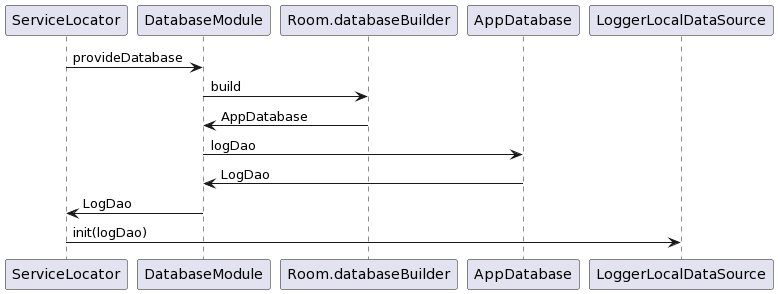
以下便是在創建 LoggerLocalDataSource 時,套用 Hilt Module 前後對比 :

現在我們可以回到 LogFragment 中將以下方法 comment 掉 :
override fun onAttach(context: Context) {
    super.onAttach(context)
    populateFields(context)
}

private fun populateFields(context: Context) {

    logger = (context.applicationContext as LogApplication).serviceLocator.loggerLocalDataSource
    android.util.Log.d("LOG_FRAG", "onAttach $dateFormatter")
    dateFormatter =
        (context.applicationContext as LogApplication).serviceLocator.provideDateFormatter()
}
並將 logger 與 dateFormatter 都加上 @Inject :
@Inject lateinit var logger: LoggerLocalDataSource
@Inject lateinit var dateFormatter: DateFormatter
除了 LogDao 外,這個專案中還有一個介面 :
interface AppNavigator {
    fun navigateTo(screen: Screens)
}
AppNavigator 與 Hilt Module
可想而知,想要注入 AppNavigator 也需要用到 @Module。 但其實 AppNavigator 與 LogDao 有所不同。
AppNavigator 會在 MainActivity 中使用 :
@AndroidEntryPoint
class MainActivity : AppCompatActivity() {
    private lateinit var navigator: AppNavigator

    /* code */

    override fun onCreate(saveInstanceState: Bundle?) {
        // ...
        navigator = (applicationContext as LogApplication).serviceLocator.provideNavigator(this)
        // ...
    }
}
而 MainActivity 會在 ServiceLocator 中通過 AppNavigatorImpl 取得 :
fun provideNavigator(activity: FragmentActivity): AppNavigator {
    return AppNavigatorImpl(activity)
}
由於我們有實際實作 AppNavigator 而不像 LogDao 需要從其他地方取得實作,所以我們此時就可以使用 @Binds 了。
Module @Binds 的範例
由於每個 Module 只能有一種行為 @Provides 或 @Binds,所以我們需要再創建另一個 Module :
@InstallIn(ActivityComponent::class)
@Module
abstract class NavigationModule {
    @Binds
    abstract fun bindNavigator(impl: AppNavigatorImpl): AppNavigator
}
注意:@Binds 必須要是 abstract fun 所以 NavigationModule 也必須是抽象類別
另外,由於 AppNavigator 只有在 MainActivity 時需要使用,所以我們可以將他安裝為 ActivityComponent。
接下來就是要將 AppNavigatorImpl 設定成 @Inject :
class AppNavigatorImpl @Inject constructor(private val activity: FragmentActivity) : AppNavigator
但問題來了,要如何注入 `activity` 呢?
很慶幸的是只要是繼承 FragmentActivity 的, Hilt 都會有預設的 Bindings,如下 :
| Android component | Default bindings |
|---|---|
| SingletonComponent | Application |
| ActivityRetainedComponent | Application |
| ViewModelComponent | SavedStateHandle |
| ActivityComponent | Application, Activity |
| FragmentComponent | Application, Activity, Fragment |
| ViewComponent | Application, Activity, View |
| ViewWithFragmentComponent | Application, Activity, Fragment, View |
| ServiceComponent | Application, Service |
所以 Hilt 會自動注入 AppNavigatorImpl 所需要的 FragmentActivity。
最後只需要將 MainActivity 的 navigator 設為 @Inject 並移除他預設的創建方法即可 :
@Inject lateinit var navigator: AppNavigator

// and

// navigator = (applicationContext as LogApplication).serviceLocator.provideNavigator(this)
Hilt 的複習
目前還需要使用 ServiceLocator 的就只剩 ButtonFragment 了。
首先,我們要讓 Hilt 將 ButtonFragment 內部創建元件,所以需要先將 ButtonFragment 設為 @AndroidEntryPoint :
@AndroidEntryPoint
class ButtonsFragment : Fragment()
之後再將 logger 與 navigator 設為 @Inject 並將他們的創建方法都去掉即可 :
@Inject lateinit var logger: LoggerLocalDataSource
@Inject lateinit var navigator: AppNavigator

//    override fun onAttach(context: Context) {
//        super.onAttach(context)
//
//        populateFields(context)
//    }
//
//    private fun populateFields(context: Context) {
//        logger = (context.applicationContext as LogApplication).
//            serviceLocator.loggerLocalDataSource
//
//        navigator = (context.applicationContext as LogApplication).
//            serviceLocator.provideNavigator(requireActivity())
//    }
在重跑一次後,你會發現切都被 Hilt 包括了。 這時就可以將 ServiceLocator 移除了。要記得也將 AppTest 移除,因為他也有使用 ServiceLocator。
Hilt Intermediate
目前我們的專案中只有一種 DataSource,也就是使用 Room 的 LoggerLocalDataSource。 但如果我希望有另一個 LoggerDataSouce 是不使用 Room 的,而是 in memory 的呢?
這時我們就可以創建一個共用介面 :
// Common interface for Logger data sources.
interface LoggerDataSource {
    fun addLog(msg: String)
    fun getAllLogs(callback: (List<Log>) -> Unit)
    fun removeLogs()
}
並建立一個使用 LinkList 來存放 Log 的 LoggerInMemoryDataSource :
@ActivityScoped
class LoggerInMemoryDataSource @Inject constructor() : LoggerDataSource {

    private val logs = LinkedList<Log>()

    override fun addLog(msg: String) {
        logs.addFirst(Log(msg, System.currentTimeMillis()))
    }

    override fun getAllLogs(callback: (List<Log>) -> Unit) {
        callback(logs)
    }

    override fun removeLogs() {
        logs.clear()
    }
}
其實我們的 LoggerInMemoryDataSource 可以使用 @Singleton 的,但竟然我們只有一個 MainActivity ,我們就在這示範使用 @ActivityScoped 了。 這樣一來 MainActivity 嚇得 Fragment 都可以使用。

另外,我們也要將 ButtonFragment 與 LogsFragment 的 logger 改成是 LoggerDataSource 而非 LoggerLocalDataSouce :
@Inject lateinit var logger: LoggerDataSource
現在如果跑起來,你會得到以下錯誤訊息 :
without an @Provides-annotated method.
  public abstract static class SingletonC implements LogApplication_GeneratedInjector,
                         ^
      com.example.android.hilt.data.LoggerDataSource is injected at
          com.example.android.hilt.ui.ButtonsFragment.logger
      com.example.android.hilt.ui.ButtonsFragment is injected at
          com.example.android.hilt.ui.ButtonsFragment_GeneratedInjector.injectButtonsFragment(com.example.android.hilt.ui.ButtonsFragment) [com.example.android.hilt.LogApplication_HiltComponents.SingletonC → com.example.android.hilt.LogApplication_HiltComponents.ActivityRetainedC → com.example.android.hilt.LogApplication_HiltComponents.ActivityC → com.example.android.hilt.LogApplication_HiltComponents.FragmentC]
  It is also requested at:
      com.example.android.hilt.ui.LogsFragment.logger
  The following other entry points also depend on it:
      com.example.android.hilt.ui.LogsFragment_GeneratedInjector.injectLogsFragment(com.example.android.hilt.ui.LogsFragment) [com.example.android.hilt.LogApplication_HiltComponents.SingletonC → com.example.android.hilt.LogApplication_HiltComponents.ActivityRetainedC → com.example.android.hilt.LogApplication_HiltComponents.ActivityC → com.example.android.hilt.LogApplication_HiltComponents.FragmentC]
這是因為 Hilt 並不知道該如何創建 LoggerDataSource 所以我們需要再創建兩個 Modules。
多個 Module
// LoggerModule.kt
@InstallIn(SingletonComponent::class)
@Module
abstract class LoggingDatabaseModule {

    @Singleton
    @Binds
    abstract fun bindDatabaseLogger(impl: LoggerLocalDataSource): LoggerDataSource
}

@InstallIn(ActivityComponent::class)
@Module
abstract class LoggingInMemoryModule {

    @ActivityScoped
    @Binds
    abstract fun bindInMemoryLogger(impl: LoggerInMemoryDataSource): LoggerDataSource
}
我們使用 @Binds 是因為 Hilt 已經知道如何取得 LoggerLocalDataSource 與 LoggerInMemoryDataSource。
當我們跑起來後,我們會得到以下錯誤訊息 :
/Users/jimmy/Downloads/GitHub/Android/official/codelab/codelab-android-hilt/app/build/generated/hilt/component_sources/debug/com/example/android/hilt/LogApplication_HiltComponents.java:133: error: [Dagger/DuplicateBindings] com.example.android.hilt.data.LoggerDataSource is bound multiple times:
  public abstract static class SingletonC implements LogApplication_GeneratedInjector,
                         ^
      @Singleton @Binds @org.jetbrains.annotations.NotNull com.example.android.hilt.data.LoggerDataSource com.example.android.hilt.di.LoggingDatabaseModule.bindDatabaseLogger(com.example.android.hilt.data.LoggerLocalDataSource)
      @Binds @dagger.hilt.android.scopes.ActivityScoped @org.jetbrains.annotations.NotNull com.example.android.hilt.data.LoggerDataSource com.example.android.hilt.di.LoggingInMemoryModule.bindInMemoryLogger(com.example.android.hilt.data.LoggerInMemoryDataSource)
      com.example.android.hilt.data.LoggerDataSource is injected at
          com.example.android.hilt.ui.ButtonsFragment.logger
      com.example.android.hilt.ui.ButtonsFragment is injected at
          com.example.android.hilt.ui.ButtonsFragment_GeneratedInjector.injectButtonsFragment(com.example.android.hilt.ui.ButtonsFragment) [com.example.android.hilt.LogApplication_HiltComponents.SingletonC → com.example.android.hilt.LogApplication_HiltComponents.ActivityRetainedC → com.example.android.hilt.LogApplication_HiltComponents.ActivityC → com.example.android.hilt.LogApplication_HiltComponents.FragmentC]
  It is also requested at:
      com.example.android.hilt.ui.LogsFragment.logger
  The following other entry points also depend on it:
      com.example.android.hilt.ui.LogsFragment_GeneratedInjector.injectLogsFragment(com.example.android.hilt.ui.LogsFragment) [com.example.android.hilt.LogApplication_HiltComponents.SingletonC → com.example.android.hilt.LogApplication_HiltComponents.ActivityRetainedC → com.example.android.hilt.LogApplication_HiltComponents.ActivityC → com.example.android.hilt.LogApplication_HiltComponents.FragmentC]
很顯然 Hilt 不知道該用哪個,尤其是這行 :
error: [Dagger/DuplicateBindings] com.example.android.hilt.data.LoggerDataSource is bound multiple times
這時我們需要使用 Qualifier。
What qualifiers are, what problems they solve, and how to use them.
A qualifier is an annotation used to identify a binding.
也就是說,我們可以通過 Qualifier 讓 Hilt 知道該使用哪個 Binds。
在 LoggerModule 中新增兩種 Qualifier :
@Qualifier
annotation class InMemoryLogger

@Qualifier
annotation class DatabaseLogger
然後使用他們來定義 bindDatabaseLogger 與 bindInMemoryLogger :
@InstallIn(SingletonComponent::class)
@Module
abstract class LoggingDatabaseModule {

    @DatabaseLogger
    @Singleton
    @Binds
    abstract fun bindDatabaseLogger(impl: LoggerLocalDataSource): LoggerDataSource
}

@InstallIn(ActivityComponent::class)
@Module
abstract class LoggingInMemoryModule {

    @InMemoryLogger
    @ActivityScoped
    @Binds
    abstract fun bindInMemoryLogger(impl: LoggerInMemoryDataSource): LoggerDataSource
}
最後我們也將這些 Qualifier 也用在需要注入的地方 :
@AndroidEntryPoint
class LogsFragment : Fragment() {

    @InMemoryLogger
    @Inject lateinit var logger: LoggerDataSource
    ...
}
Hilt Unit Test
Testing with Hilt requires no maintenance because Hilt automatically generates a new set of components for each test.
想要配合 Hilt 進行測試就得加上對應的函式庫 :
dependencies {
    // Hilt testing dependency
    androidTestImplementation "com.google.dagger:hilt-android-testing:$hilt_version"
    // Make Hilt generate code in the androidTest folder based on its annotation
    kaptAndroidTest "com.google.dagger:hilt-android-compiler:$hilt_version"
}
除此之外,因為 Hilt 需要注入,所以他必須也要有一個 Application 來讓他進入才行。 這時就會使用到函式庫中的 HiltTestApplication 了。 但想要這麼做就需要一個客製化的 Runner 才行。
HiltTestApplication 的起手式
首先,我們需要創建一個客製化 Runner。 而他的作用是創建一個 HiltTestApplication :
class CustomTestRunner : AndroidJUnitRunner() {
    override fun newApplication(cl: ClassLoader?, name: String?, context: Context?): Application {
        return super.newApplication(cl, HiltTestApplication::class.java.name, context)
    }
}
再來,我們必須要讓專案知道我們測試時要使用 CustomTestRunner 。 所以我們會在 app/build.gradle 中將其設為 testInstrumentationRunner :
...
android {
    ...
    defaultConfig {
        ...
        //        testInstrumentationRunner 'androidx.test.runner.AndroidJUnitRunner'
        testInstrumentationRunner "com.example.android.hilt.CustomTestRunner"
    }
    ...
}
...
Hilt Unit Test 的設定
現在我們回到 AppTest 中,首先先移除 @After 因為我們已經不需要使用 SerivceLocator 了 :
@RunWith(AndroidJUnit4::class)
class AppTest {

//    @After
//    fun tearDown() {
//        // Remove logs after the test finishes
//        ServiceLocator(getInstrumentation().targetContext).loggerLocalDataSource.removeLogs()
//    }
}
HiltAndroidTest 與 Hilt Rule
再來就是將這個 AppTest 設為 @HiltAndroidTest :
@RunWith(AndroidJUnit4::class)
@HiltAndroidTest
class AppTest
@HiltAndroidTestSet the retention to RUNTIME because we check it via reflection in the HiltAndroidRule.
從源碼的敘述得知, @HiltAndroidTest 需要配合 HiltAndroidRule 使用。 所以我們還需要設定 @Rule :
@RunWith(AndroidJUnit4::class)
@HiltAndroidTest
class AppTest {

    @get:Rule
    var hiltRule = HiltAndroidRule(this)

    ...
}
Reference
About Post
- Author:Jimmy Liu
- Link:https://kuopingl.github.io//2023/11/16/23-lfa-3-hilt/
- Copyright:Free to share and adapt, but remember to give proper credit(CC BY-SA 3.0)